01 - Linux & Docker
Robotics I
Poznan University of Technology, Institute of Robotics and Machine Intelligence

Laboratory 1: Introduction to Linux and lightweight containerization with Docker
Goals
- Understand the basics of Linux and its command-line interface (CLI)
- Explore the concept of lightweight containerization with Docker
- Differentiate between Dockerfile, Docker image, and Docker container
- Get hands-on experience with Docker
Resources
- The Linux command line for beginners
- Docker documentation
- Docker Hub Container Image Library
- Developing inside a Container
Linux
 Source: https://wikipedia.org/wiki/Linux
Linux is an open-source, Unix-like operating system that was first developed by Linus Torvalds in 1991. Over the years, it has become one of the most widely used operating systems, powering everything from personal computers and smartphones to cloud servers and supercomputers. Unlike proprietary operating systems such as Windows or MacOS, Linux is free to use, modify, and redistribute, making it a popular choice for developers, system administrators, and enthusiasts.
One of the defining features of Linux is its open source nature, which means that the source code is accessible to anyone who wants to inspect, modify, or contribute to it. This has led to the development of multiple Linux distributions (distros), such as Ubuntu, Fedora, Debian, and CentOS, each designed for different use cases - from personal desktops to enterprise-level servers.
In addition, Linux is built on a monolithic kernel, which means it interacts directly with the hardware and manages resources, such as memory, processes, and devices. This allows Linux to be highly efficient and customizable. Most Linux systems also come with a wide range of utilities and tools, making it a powerful platform for development or system administration.
The Command Line Interface (CLI)
The Command Line Interface (CLI) is a text-based interface used to interact with a computer’s operating system. Unlike graphical user interfaces (GUIs), where users interact with the system through windows, icons, and buttons, the CLI requires users to type specific text commands to perform actions. In Linux, the CLI is often called a shell, and the most common is Bash (GNU Bourne-Again SHell).
The CLI is a powerful tool that allows users to perform tasks like navigating the file system, manipulating files, managing processes, and configuring system settings - all with precise control. While GUIs are often more user-friendly and visually intuitive, the CLI offers several advantages:
- speed - many tasks can be completed much faster through commands than through point-and-click actions in a GUI.
- automation - the CLI allows users to automate repetitive tasks using shell scripts that can be saved and run multiple times.
- advanced control - the CLI provides deeper, more granular control over the operating system, often offering functionality that isn’t available through a GUI.
- remote access - the CLI can be accessed remotely, enabling system administrators to manage servers from anywhere in the world using tools such as SSH (Secure Shell).
Mastering the CLI is essential for proficient use of Linux because it is a textual interface to your computer. It provides the flexibility and efficiency needed to perform complex tasks, especially in professional environments such as software development, system administration, and data science.
The most popular Linux commands
ls- lists the contents of a directorycd- changes the current working directorypwd- prints the current working directory pathmkdir- creates a new directoryrm- removes files or directoriescp- copies files or directoriesmv- moves or renames files or directoriescat- concatenates and displays file contentecho- prints a line of text or outputtouch- creates an empty file or updates the timestamp of an existing filechmod- changes the permissions of a file or directorykill- sends a signal to terminate a processgrep- searches for a pattern within filesfind- searches for files and directories in a directory hierarchywget- downloads files from the web
Tasks
- Open terminal, go to the Downloads directory and create folder which has your index number in its name.
- Inside the folder create empty file hello_world.sh using
CLI. Open this file using CLI text editor (nano -
nano <FILE NAME>) and write a command that prints"Hello World!"when the script is called. - Call the script with bash command:
bash hello_world.sh. Then make the script executable so that it can be invoked with the command./hello_world.sh. Upload script to eKursy.
Docker
Source: https://www.docker.com
Docker is an open platform for developing, shipping, and running applications. Docker enables you to separate your applications from your infrastructure so you can deliver software quickly. With Docker, you can manage your infrastructure in the same ways you manage your applications. By taking advantage of Docker’s methodologies for shipping, testing, and deploying code, you can significantly reduce the delay between writing code and running it in production.
There are three major elements of the Docker:
- Dockerfiles - a set of precise instructions presented as a text document used to create a Docker image.
- Images - think of them as prebuilt recipes. You cannot work inside images
- Containers - are physical entities created based on images. You will work in containers.
![]() Source: https://linuxiac.com/what-is-docker-container
Source: https://linuxiac.com/what-is-docker-container
All classes are prepared in Docker to facilitate the usage of your own computer during the classes and be able to finish the instructions at your own pace. The usage of a lightweight virtualization tool, Docker, should guarantee us the following:
- no dependency issues between libraries,
- repeatability on various hardware configurations,
- and going directly to the main goal of the lesson without technical problems.
Installation
Docker is already installed on computers in the
laboratory. In labs, we are using Ubuntu. To be
able to complete the course instructions on your own equipment, we
suggest installing Docker on your own computer. The example installation
steps are presented on Install Docker Engine
page. For Windows it is recommended to use Docker through WSL2
(Windows Subsystem for Linux).
Docker without sudo
This is already configured on computers in the laboratory. The installed docker configuration requires sudo privileges to perform any command. It is time-consuming but we can avoid it by adding the current user of the system to appropriate group. We will follow the steps listed at the link:
- Create a docker group with
sudo groupadd docker- Add user to the group:
sudo usermod -aG docker $USER- Reload the groups in the system:
newgrp dockerOnce completed, one should be able to use docker without a need to specify sudo in front of every command.
GUI
The docker creates lightweight containers but having window applications is not easily supported. During the classes, we will use windows to see the view from the camera or visualize the results. To see application windows you have to have Nvidia GPU and additionally install nvidia-docker2 package according to the steps described in Installing the NVIDIA Container Toolkit guide. The computer in the lab should have everything installed on them.
Docker commands
- List Docker images
docker images- List all Docker containers
docker ps -a- Pull Docker image from Docker Hub
docker pull <IMAGE NAME>[:<DOCKER TAG>]- Create and run a new container from an image with interactive Bash
docker run -it <IMAGE NAME> bash- Start stopped Docker container
docker start <CONTAINER NAME>- Stop Docker container
docker stop <CONTAINER NAME>- Execute an interactive bash shell on the container
docker exec -it <CONTAINER NAME> bash- Copy file from host to container
docker cp path/to/file/on/host <CONTAINER NAME>:path/to/file/in/container- Copy file from container to host
docker cp <CONTAINER NAME>:path/to/file/in/container path/to/file/on/host- Remove Docker container
docker rm <CONTAINER NAME>- Remove Docker image
docker rmi <IMAGE NAME>In addition, one can exit the container with CTRL + d. Once out, it will be stopped (not actively working, but stored).
Multiple terminals
In many practical applications of robotics, we are dealing with the need to handle many terminals simultaneously. It is possible to switch between terminals, but it is also possible to use other tools, such as:
- Running commands in separate tabs of the selected terminal. A new bookmark can be created with the shortcut CTRL + SHIFT + t. To change the tab, you can use the ALT + X shortcut, where X is the terminal number or CTRL + PageUp / CTRL + PageDown.
- You can use a terminator. More information can be found at the link.
- You can use tmux. More information can be found at the link.
Docker in VS Code
Installing any development IDE inside a container is possible, but such an approach does not scale well for development in multiple containers. Fortunately, modern IDEs installed on the host computer can support code development inside a container. We will use VS code as a free IDE with a Remote Development extension pack during our classes. The VS Code is already installed on the computers in the laboratory.
To install the Remote Development extension pack:
- Start VS Code
- Launch VS Code Quick Open (Ctrl+P)
- Paste:
ext install ms-vscode-remote.vscode-remote-extensionpack - Press Enter
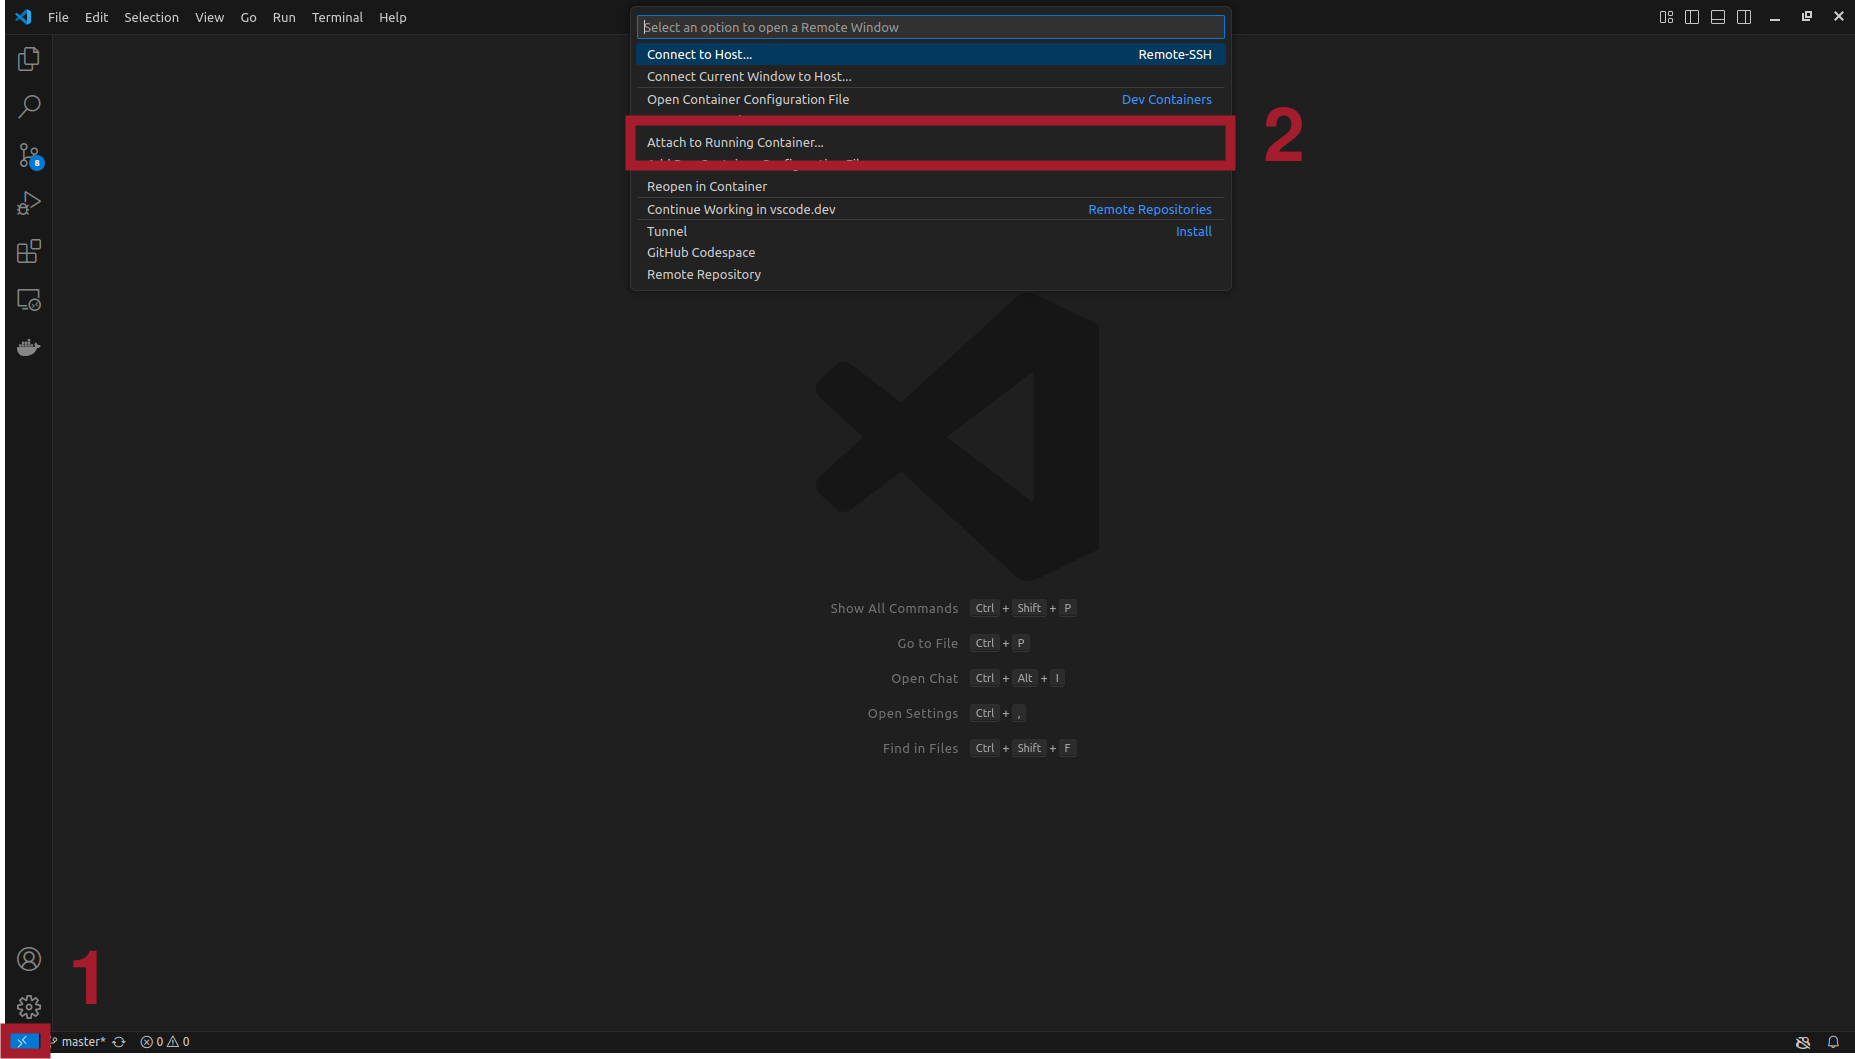
Once configured, we can attach it to the running container and open the directory inside a container. You can do it by pressing the icon in the bottom left corner (1). And then select the option Attach to the running container (2). Then select your container from the list.


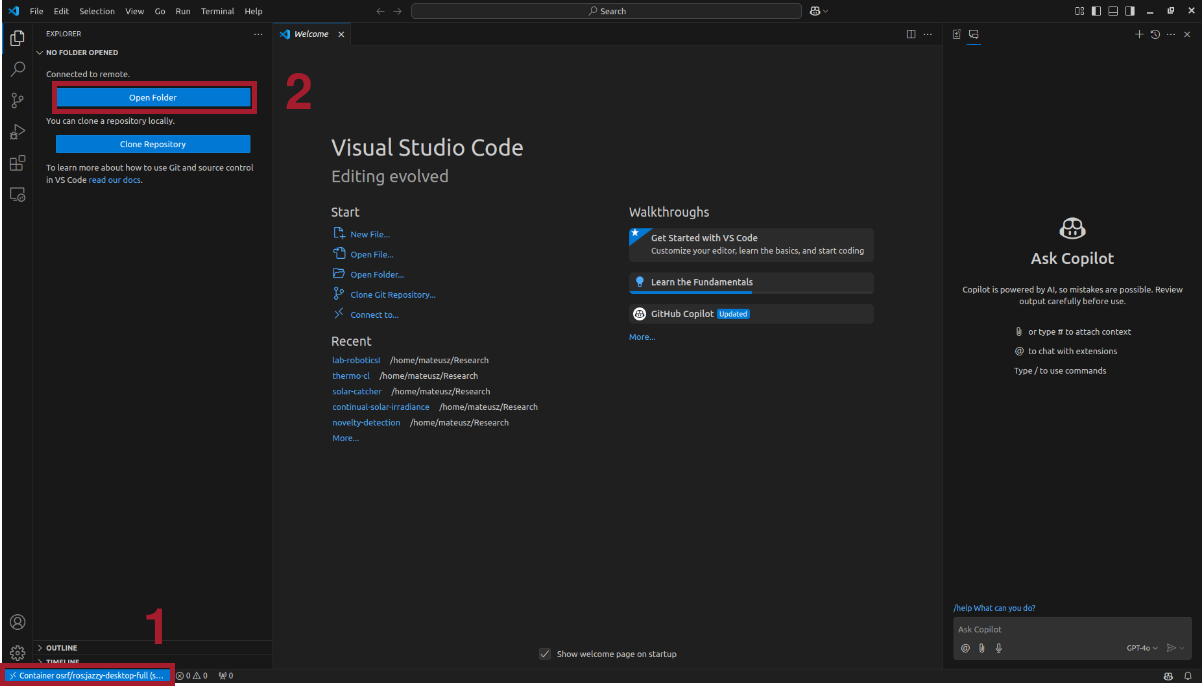
Make sure that you are connected to the container (left bottom corner) (1), and then open the working directory (2).

During our classes, we will compile and run the code from the command line (outside of IDE) as it would take more time to set up. But it is possible to configure it inside IDE as well as to be able to debug the application. It is worth noting that robotic systems usually use many simultaneous threads and are often distributed, making debugging much more complicated in practice.
Tasks
Note: Everything we do today should be done inside
the container! To attach another terminal to a running container use the
command docker exec -it <CONTAINER NAME> bash.
- From osrf/ros
repository at Docker Hub pull image with
jazzy-desktop-fulltag image. Then run the container using the below command. As a Docker image use the combination of the image repository and the pulled image tag (<DOCKER IMAGE REPOSITORY>:<DOCKER IMAGE TAG>). While as a container name you can use any string, for example your student’s index number. Use the following code to create thedocker_run.shscript and set theIMAGE_NAMEandCONTAINER_NAMEvariables.
IMAGE_NAME=""
CONTAINER_NAME=""

xhost +local:root

XAUTH=/tmp/.docker.xauth
if [ ! -f $XAUTH ]
then
    xauth_list=$(xauth nlist :0 | sed -e 's/^..../ffff/')
    if [ ! -z "$xauth_list" ]
    then
        echo $xauth_list | xauth -f $XAUTH nmerge -
    else
        touch $XAUTH
    fi
    chmod a+r $XAUTH
fi

docker stop $CONTAINER_NAME || true && docker rm $CONTAINER_NAME || true

docker run -it \
    --env="DISPLAY=$DISPLAY" \
    --env="QT_X11_NO_MITSHM=1" \
    --volume="/tmp/.X11-unix:/tmp/.X11-unix:rw" \
    --env="XAUTHORITY=$XAUTH" \
    --volume="$XAUTH:$XAUTH" \
    --privileged \
    --network=host \
    --name="$CONTAINER_NAME" \
    $IMAGE_NAME \
/bin/bash- Analyze and answer the roles of the following docker run flags.
Upload your answer to eKursy.
-it--privileged--network=host--volume--gpus all--rm--cpu-shares--name
- Start container, connect multiple terminals to the container, and stop it.
- Install text editors and check their operation in the Docker. Verify that the pop-up appears correctly for GUI-based editor:
- Modify the command creating the container from task 1 by sharing the selected system directory with a path in the container. Rerun the container to see the effect. Try creating files in the host system and inside the Docker container.
- Connect Docker with VS Code and open created container. From VS Code
write a simple Python script that runs locally in a Docker container
printing
"Hello World!".